How to Clean a Shower Head with Vinegar
If your shower has started spraying sideways, dribbling from a few holes, or losing pressure, the shower head may not be broken. It may simply be clogged with mineral scale from hard water.
The good news: in many cases, you can clean a shower head with vinegar, a toothbrush, and a little patience. The EPA recommends inspecting showerheads for scale buildup and using a cleaning product or white vinegar to remove it, and the CDC also notes that visible buildup is a good time to clean showerheads and faucet aerators. ([epa.gov](https://www.epa.gov/watersense/home-maintenance?utm_source=openai))
What Vinegar Does Well
White vinegar is mildly acidic, which makes it useful for loosening common hard water deposits like limescale. It is best for chalky white or gray buildup around the spray holes, crust on the face of the shower head, and uneven spray caused by mineral deposits.
Vinegar is not a magic fix for every shower problem. If the shower head is cracked, badly corroded, leaking from an internal seam, or still weak after cleaning, replacement may be the better answer. If the whole bathroom has low water pressure, the issue may be farther back in the plumbing.
Supplies You’ll Need
- Distilled white vinegar
- A sturdy plastic bag or a bowl
- Rubber band, twist tie, or painter’s tape
- Old toothbrush or small cleaning brush
- Toothpick or soft plastic pick
- Microfiber cloth
- Adjustable wrench, if removing the shower head
- Plumber’s tape, if reinstalling a threaded shower head
Important: Do not poke the spray holes with metal wire, pins, or drill bits. You can enlarge or damage the openings, which may make the spray pattern worse. EPA WaterSense guidance specifically warns against boring holes in showerheads to clear scale. ([nepis.epa.gov](https://nepis.epa.gov/Exe/ZyPURL.cgi?Dockey=P1017K2Z.txt&utm_source=openai))
Before You Start: Check the Finish
Vinegar is safe for many basic chrome and stainless finishes when used reasonably, but it can be too harsh for some specialty finishes, natural stone nearby, or plated surfaces if left too long. If your shower head is oil-rubbed bronze, brass, matte black, gold-toned, or has a manufacturer’s special coating, check the care instructions first.
For a cautious first try, use a 50/50 mix of white vinegar and water and limit the soak to 30 minutes. Delta Faucet, for example, recommends a 50/50 white vinegar and water soak for more difficult mineral deposits on many non-Touch-Clean shower heads. ([deltafaucet.com](https://www.deltafaucet.com/node/264?utm_source=openai))
Method 1: Clean a Fixed Shower Head with a Vinegar Bag
This is the easiest method when the shower head is attached firmly and you do not want to remove it.
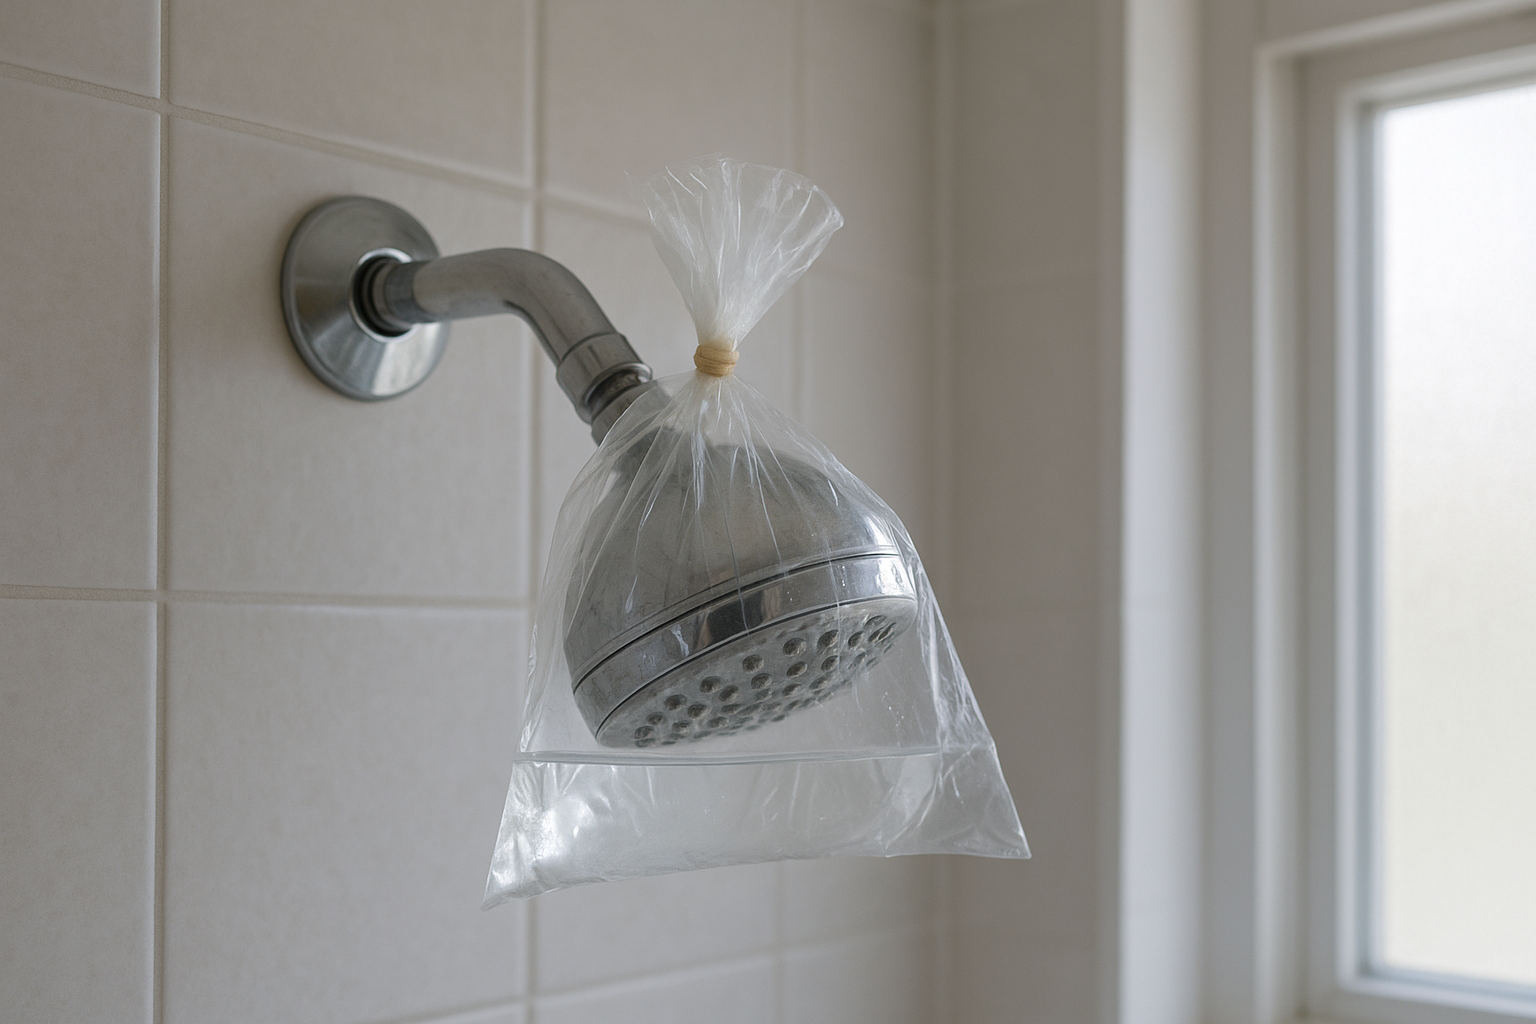
- Fill the bag. Pour enough white vinegar into a plastic bag to cover the face of the shower head. For delicate finishes, use half vinegar and half water.
- Attach the bag. Lift the bag over the shower head so the spray holes are submerged. Secure it with a rubber band, twist tie, or painter’s tape around the shower arm.
- Soak. Let it sit for 30 minutes to 2 hours. For heavy chrome hard-water buildup, you can go longer, but avoid overnight soaking on specialty finishes unless the manufacturer says it is safe.
- Remove and scrub. Take off the bag, then scrub the face gently with an old toothbrush.
- Clear stubborn holes. Use a toothpick or soft plastic pick to loosen softened deposits from individual nozzles.
- Flush the shower head. Run hot water for a minute or two to push out loosened grit.
- Wipe dry. Buff the fixture with a microfiber cloth to remove vinegar residue and water spots.
Method 2: Remove and Soak the Shower Head
If the buildup is severe, or if you suspect mineral deposits are trapped inside the shower head, removing it gives you a better clean. The CDC says you may need to remove the showerhead and hose and soak them in a solution such as white vinegar to remove buildup. ([cdc.gov](https://www.cdc.gov/drinking-water/prevention/preventing-waterborne-germs-at-home.html?utm_source=openai))
- Turn the shower off. You usually do not need to shut off water to the whole house, but make sure the shower valve is fully off.
- Unscrew the shower head. Try by hand first. If it is tight, wrap the connection with a cloth and use an adjustable wrench.
- Remove loose debris. Rinse the shower head under a faucet, letting water run through it backward if possible.
- Soak in vinegar. Place it in a bowl of white vinegar or a 50/50 vinegar-water mix. Soak for 30 minutes to 2 hours, depending on buildup and finish.
- Brush and rinse. Scrub the face and threads gently, then rinse thoroughly.
- Reinstall. Wrap fresh plumber’s tape clockwise around the shower arm threads if needed, then screw the shower head back on. Hand-tighten first; snug gently with a wrench only if it leaks.
- Flush. Run the shower for 1 to 2 minutes to clear loosened scale.
What About Germs and Biofilm?
Mineral scale is not the only reason to clean a shower head. The CDC explains that germs can live together in a slimy layer called biofilm in household water devices, including showerheads, and recommends cleaning showerheads and faucet aerators when you can see buildup. ([cdc.gov](https://www.cdc.gov/drinking-water/prevention/preventing-waterborne-germs-at-home.html?utm_source=openai))
For most healthy households, regular cleaning and flushing are practical steps. If a shower has not been used for a week or more, the CDC recommends flushing cold water fully for 2 minutes, then hot water until it starts to feel hot. This is especially useful for guest bathrooms, vacation homes, or a shower after travel. ([cdc.gov](https://www.cdc.gov/drinking-water/prevention/preventing-waterborne-germs-at-home.html?utm_source=openai))
Common Mistakes to Avoid
- Mixing vinegar with bleach. Never mix vinegar with bleach or bleach-based bathroom sprays. The combination can release dangerous fumes.
- Using steel wool. It can scratch chrome, brushed nickel, and plated finishes.
- Soaking too long. Longer is not always better, especially on specialty finishes or rubber parts.
- Forgetting to flush. Vinegar loosens grit. Running water afterward helps push that grit out instead of letting it settle back inside.
- Ignoring the hose. If you have a handheld shower, mineral buildup can collect in the hose and connection screen too.
If Vinegar Doesn’t Fix the Spray
If the shower head still sprays poorly after cleaning, try these checks before buying a new one:
- Look for a small inlet screen. Some shower heads have a mesh washer or screen where the head connects to the shower arm. Rinse it gently if it is clogged.
- Check for loosened debris. Remove the shower head again and rinse water through it from both directions.
- Test the shower arm flow. With the shower head removed, briefly turn on the water into a bucket. If flow from the pipe is weak, the problem is not just the shower head.
- Inspect for cracks or worn seals. Leaks at the swivel joint or seams may mean the fixture is worn out.
If you replace it, consider a WaterSense-labeled showerhead. WaterSense models are certified to use less water while still providing a satisfactory spray, according to the EPA. ([epa.gov](https://www.epa.gov/watersense/home-maintenance?utm_source=openai))
How Often Should You Clean a Shower Head?
There is no single schedule that fits every home. A shower in a hard-water area may need cleaning every month or two, while a home with softer water may only need it a few times a year. A simple rule is to clean it when you see crusty buildup, notice stray sprays, or feel the water pressure dropping at that shower.
To slow buildup, wipe the shower head face when you clean the bathroom, rub flexible rubber nozzles with your thumb to loosen fresh deposits, and fix drips promptly. A quick wipe now is much easier than a heavy descaling job later.
Bottom Line
To clean a shower head with vinegar, soak the spray face for 30 minutes to 2 hours, scrub gently, clear softened deposits with a toothpick, and flush well with water. Remove the shower head for a deeper soak if buildup is heavy or trapped inside.
Done carefully, this simple maintenance job can restore a stronger, more even spray without replacing the fixture—and without reaching for harsh cleaners first.