How to Winterize Outdoor Faucets Before a Freeze
Outdoor faucets are easy to forget until the first hard freeze is in the forecast. A few minutes of fall maintenance can help prevent a split hose bib, frozen pipe, or surprise leak inside the wall when the weather warms back up.
Here’s how to winterize outdoor faucets the practical way, whether you have standard hose bibs, frost-free spigots, or no indoor shutoff valve at all.
Why Outdoor Faucets Freeze
Water expands when it freezes, and that pressure has to go somewhere. Outdoor faucets are especially vulnerable because they sit on an exterior wall and often have short supply lines running through cold garages, crawl spaces, basements, or wall cavities.
A connected garden hose makes the problem worse. Even if the faucet itself is designed to drain, a hose can trap water at the spigot. That trapped water can freeze, expand, and damage the faucet or the pipe behind it.
The goal of winterizing is simple: remove as much water as possible from the faucet and nearby pipe, then protect what remains from cold air.
When to Winterize Outdoor Faucets
Do this before your first hard freeze, not after. As a rule of thumb, winterize outdoor faucets when overnight temperatures are expected to drop to 32°F or below, especially if the cold will last several hours.
If you live in a mild climate where freezes are occasional, keep faucet covers on hand and install them before cold snaps. If you live where winter freezes are routine, make faucet winterizing part of your yearly fall checklist along with gutter cleaning, furnace filters, and smoke alarm testing.
What You’ll Need
- Foam outdoor faucet covers, one for each spigot
- Bucket or towel for drips indoors
- Adjustable pliers, if a hose is stuck
- Pipe insulation for exposed supply lines in unheated areas
- Permanent marker or label maker, optional
Foam faucet covers are inexpensive and reusable. They are not magic, but they add a layer of insulation and block wind from hitting the faucet directly.
Step 1: Disconnect Every Garden Hose
Start by removing all hoses, splitters, timers, quick-connect fittings, and watering wands from outdoor faucets. Do not leave a hose attached for winter, even if you have a frost-free faucet.
If a hose is stuck, try hand pressure first. If you need pliers, use gentle pressure so you do not twist or damage the faucet body. Once the hose is off, drain it completely by stretching it downhill or lifting one end and walking the water out. Coil it loosely and store it in a garage, shed, or basement.
Tip: If you use hose timers for drip irrigation or sprinklers, remove the timer too. Many timers hold water inside and can crack during a freeze.
Step 2: Find the Indoor Shutoff Valve
Many homes have a separate shutoff valve for each outdoor faucet. Look on the inside of the wall behind the spigot, usually in a basement, crawl space, utility room, garage, or under a sink near the exterior wall.
The valve may be a round handle or a small lever. Turn a round handle clockwise until snug. Turn a lever-style valve so it sits perpendicular to the pipe.
If your home has several outdoor faucets, label each shutoff while you are checking them. A simple tag that says “front hose bib” or “back patio faucet” saves guessing later.
Step 3: Open the Outdoor Faucet to Drain It
After the indoor shutoff is closed, go back outside and open the faucet all the way. Water should run out for a short time and then slow to a drip or stop.
Leave the outdoor faucet open for winter if the indoor shutoff valve is closed. This gives any remaining water room to expand and helps you notice if the indoor shutoff is leaking.
Some indoor shutoff valves also have a small drain cap or bleeder valve on the side. If yours does, hold a bucket or towel underneath and open it carefully to drain the remaining water from the pipe. Close the bleeder once the water stops.
Step 4: Add a Foam Faucet Cover
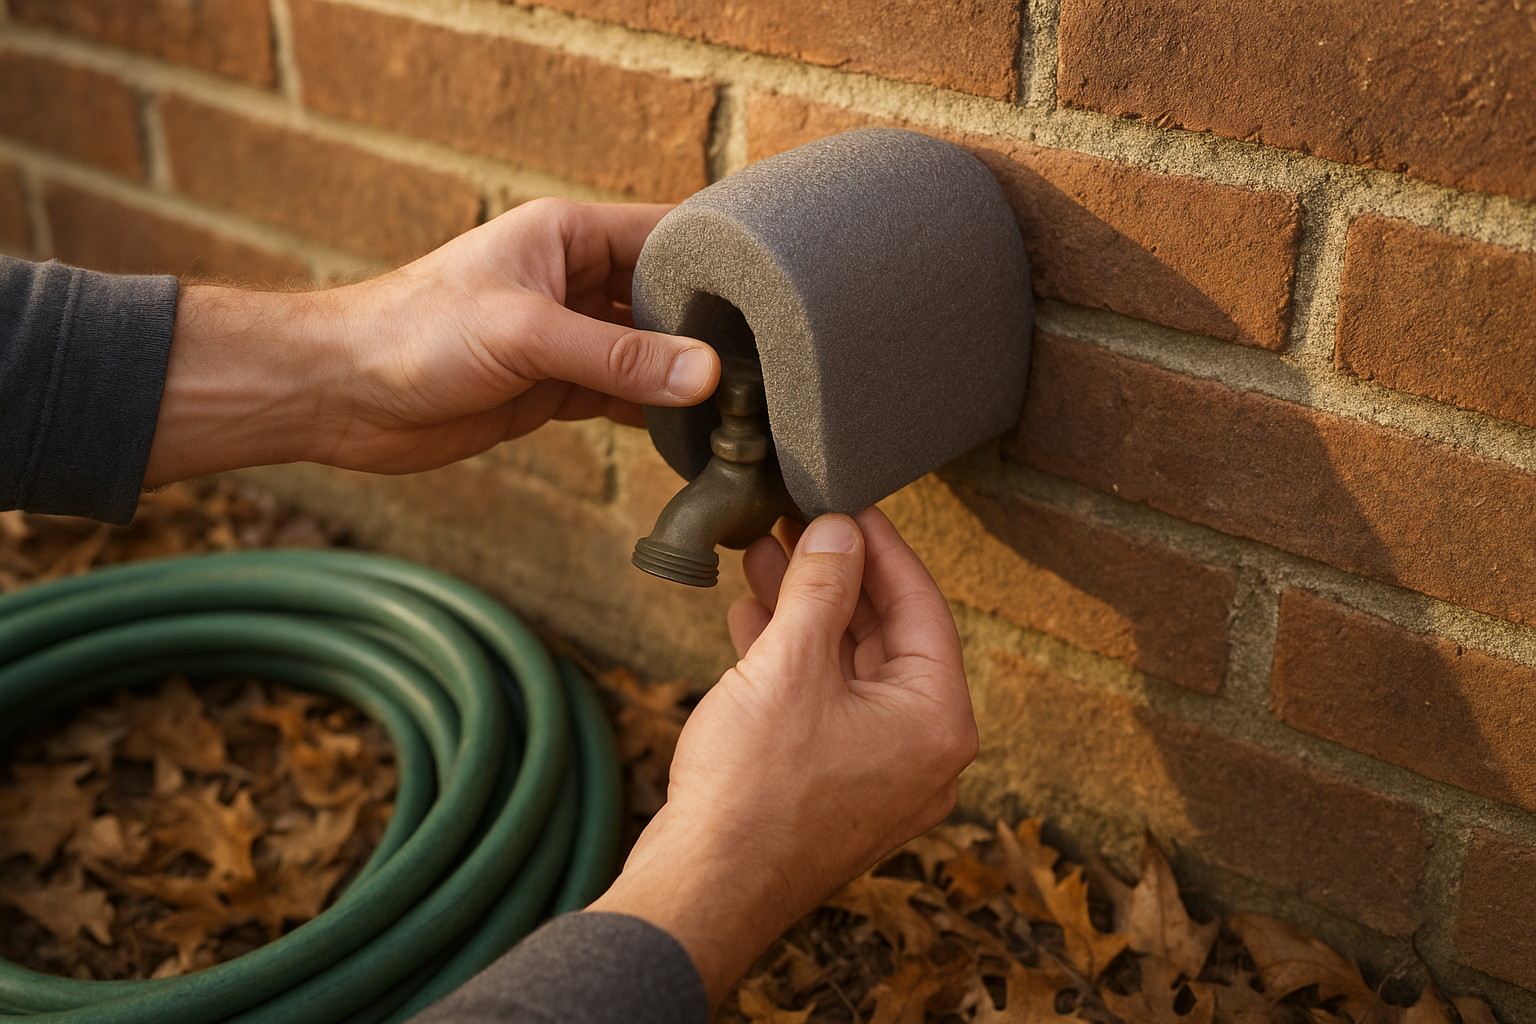
Once the faucet is drained, install a foam faucet cover. Most covers have a loop or hook that slips around the faucet, then tightens from the outside. Pull it snug so the foam sits flat against the siding, brick, or foundation.
The cover should not crush the faucet, but it should be tight enough that wind cannot easily blow behind it. If the faucet sticks out too far for a standard cover, look for an extra-deep version.
If you do not have a cover before a surprise freeze, wrap the faucet with rags or a towel and cover that with a plastic bag to keep the insulation dry. This is a temporary fix, not as tidy or durable as a proper cover.
What If You Have Frost-Free Outdoor Faucets?
A frost-free faucet, also called a frost-proof sillcock, has a long stem that shuts the water off farther inside the house instead of right at the outside wall. When installed correctly with a slight downward slope, it drains after use.
Even so, you should still disconnect hoses before freezing weather. A connected hose can prevent the faucet from draining properly. Adding a foam cover is also smart during very cold or windy weather, especially on north-facing walls or unheated garages.
If a frost-free faucet leaks from the handle, drips constantly, or has a hose left attached during a freeze, do not assume it is safe. Winterize it the same way: disconnect, drain what you can, and cover it.
What If There Is No Indoor Shutoff Valve?
Some older homes and warm-climate homes do not have dedicated indoor shutoffs for outdoor faucets. In that case, disconnect hoses and install insulated faucet covers before freezing weather.
For exposed pipes in a garage, crawl space, or along an exterior wall, add foam pipe insulation. Focus on pipes near vents, foundation openings, or poorly insulated walls where cold air can blow across the pipe.
If your area gets regular hard freezes and you do not have shutoffs, consider asking a plumber to install interior shutoff valves with drain ports. It is a small upgrade that makes winterizing easier and safer year after year.
Common Mistakes to Avoid
- Leaving hoses attached: This is the most common problem and can damage even frost-free faucets.
- Closing the outdoor faucet after draining: If the indoor valve is off, leaving the outside faucet open gives trapped water room to expand.
- Forgetting backyard or side-yard spigots: Walk the whole house, including patios, decks, garages, and detached sheds.
- Relying only on dripping outdoor faucets: Draining and shutting off the line is better when a proper indoor shutoff is available.
- Ignoring crawl spaces: A protected faucet will not help much if the pipe feeding it is exposed to freezing air underneath the house.
Quick Outdoor Faucet Winterizing Checklist
- Remove hoses, splitters, timers, and attachments.
- Drain hoses and store them out of the weather.
- Find and close the indoor shutoff valve for each outdoor faucet.
- Open the outdoor faucet fully to drain the line.
- Open the indoor bleeder cap if your shutoff has one, then close it after draining.
- Leave the outdoor faucet open for winter.
- Install a snug foam faucet cover.
- Insulate exposed pipes in garages, crawl spaces, or unheated areas.
After a Freeze: Check Before You Relax
When temperatures rise, take a quick look at each outdoor faucet and the wall or ceiling inside behind it. A burst pipe may not show itself until the ice thaws and water starts flowing again.
If you turn the indoor shutoff back on in spring, have someone stand outside by the faucet while you check inside for leaks. Open the faucet slowly, let air sputter out, and watch for dripping around the handle, siding, foundation, basement ceiling, or crawl space.
If water appears where it should not, shut the valve off right away and call a plumber. Catching a leak early can prevent a much bigger repair.
The Bottom Line
Winterizing outdoor faucets is a small job with a big payoff. Disconnect the hose, shut off and drain the line if you can, leave the faucet open, and add a foam cover for extra protection.
Do it once before freezing weather settles in, and your outdoor faucets will be much more likely to make it through winter without cracked fittings, frozen lines, or hidden water damage.